For field recording enthusiasts who are already familiar with drop rigs, you’ll appreciate the exceptional technique they provide for capturing the awe-inspiring biophony present in nature. A notable benefit of drop rigs lies in their unobtrusive approach, guaranteeing that the environment stays undisturbed, enabling you to acquire authentic, pristine recordings of nature’s harmonious orchestra.
For those new to drop rigs, they involve strategically placing a compact audio recorder equipped with small omni microphones in a specific location, initiating the recording, and then walking away. You return later to retrieve your gear and immerse yourself in the sounds captured during your absence.


Many field recordists employ drop rigs for overnight recording sessions, often extending between 12-16 hours. This timeframe allows capturing the enchanting dawn chorus, a lively birdsong symphony heralding the start of a new day. Additionally, the mysterious nocturnal sounds combined with the dawn chorus offer fantastic opportunities to gather remarkable audio recordings of natural environments, providing valuable insights into the activities and interactions of various species.
Now, you may be wondering why I aimed to achieve a recording duration of 92 hours. Extended recording sessions can capture a wide range of natural sounds and events, providing a comprehensive understanding of the environment and the species residing within it. Furthermore, a longer recording allows for capturing variations in weather, animal behaviour, and other environmental factors, resulting in a rich and detailed audio archive that can be invaluable for research, artistic projects, and personal enjoyment. Plus, I travel a lot for work, so returning to pickup gear 16 hours later is not always feasible.
As this post primarily focuses on SD cards and batteries, I won’t delve too much into other aspects of drop rigs. Instead, we can save that for another time. I recently conducted two tests to determine the best setup for extended recording sessions using drop rigs. Below, I’ve detailed my findings, but please note that my knowledge of batteries is limited, and my calculations may not be entirely accurate.
Test 1
In my first test, I set up my drop rig with the following equipment and settings:
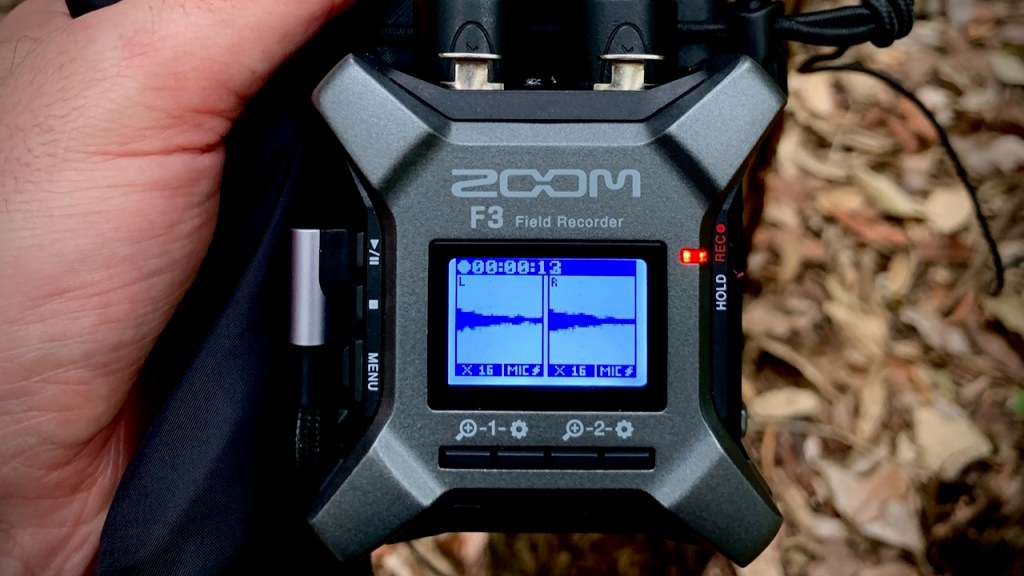
- Zoom F3 running on two internal AA lithium energizer high-capacity batteries
- 256 GB SD card.
- 96 kHz/32 bit audio quality
- 48V Phantom power
- Two EM272 Clippy microphones
- One ANKER 20,000 mAh USB (aircraft friendly) battery pack
I aimed to record 92+ hours of audio, which seemed feasible based on calculations from an online tool. After positioning the gear in my backyard, I began the recording process. Unfortunately, my rig only captured 51 hours and 23 minutes of audio before the external battery pack was drained. Still pretty good – but not what I wanted. My revised calculations indicated that to achieve 92.5+ hours of recording, I’d need a battery capacity of roughly 36,000 mAh. This presented a challenge since USB battery packs of this size are generally not allowed in carry-on luggage. This is important to me because my travel away is almost always on aircraft.
To tackle this issue, I decided to explore alternative solutions that could enable me to achieve my desired recording duration.
Test 2
In my quest to find a solution, I researched ways to connect two 20,000mAh battery packs together and discovered a 5V USB-C Dual Supply device. Intrigued, I reached out to Chris, the device’s creator, and he confirmed that it should work for my application as long as the power banks don’t turn themselves off. A common problem if the connected equipment isn’t drawing much power – like some audio recorders. Encouraged by this information, I also found a Power Bank Keep-Alive device based on a 555 Timer (SMD) that prevents the power banks from shutting down. However, it didn’t arrive in time for my second test.


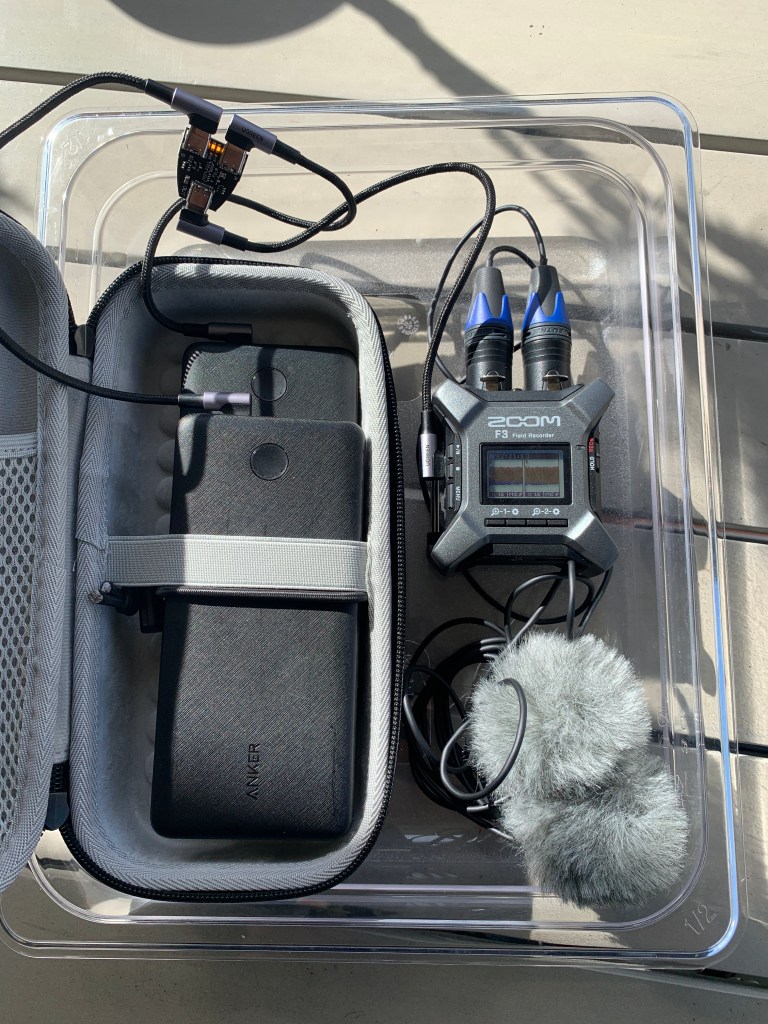

For Test 2, I used the same setup as Test 1, but with a few adjustments. I removed the internal AA batteries, switched to 24V Phantom power, and connected two ANKER 20,000 mAh USB battery packs to the 5V USB-C Dual Supply device. This time, my rig recorded 92 hours, 30 minutes, and 13 seconds of audio, and the dual battery bank lasted just over 102 hours. Surprisingly, the power consumption from the Zoom F3 was enough to keep the battery banks awake without the Power Bank Keep-Alive USB device.
During these tests, I also learned the importance of adjusting settings on the audio recorder to maximise battery life. For instance, turning off the Zoom F3’s LCD backlight and reducing the contrast in the settings can significantly extend battery life. This is a valuable tip to remember for future recording sessions.
Conclusion and Lessons Learned
Overall, I am thrilled with the results of my extended recording tests. By using a dual battery bank setup with a USB switcher, I was able to achieve over 102 hours of battery life and a total recording time of 92 hours, 30 minutes, and 13 seconds at 96kHz/32bit and 24V Phantom power. This setup exceeded my initial expectations and provided a solution for extended field recording sessions without having to compromise on carry-on luggage limitations.
The process of experimenting with various battery pack configurations and discovering new devices, such as the 5V USB-C Dual Supply and Power Bank Keep-Alive, has been an insightful learning experience. It has demonstrated the importance of trial and error in finding the optimal setup for extended field recording sessions. Furthermore, these tests have highlighted how small adjustments, such as modifying the recorder’s settings, can have a significant impact on battery life and overall recording time.
A few thoughts on 24V verses 48V phantom power
If a microphone is designed to function with both 24V and 48V phantom power like the Clippy EM272, you can choose either voltage according to your preference. Both choices can sufficiently power the microphone, but there are a few aspects to take into account when selecting the voltage:
Noise Performance
Generally, a higher voltage (48V) phantom power offers an improved signal-to-noise ratio compared to 24V. This implies that using 48V may yield a clearer and less noisy audio signal. However, the actual effect on noise performance may differ depending on the particular microphone and its design. I have noticed no audible difference with the EM272’s running at 24V.
Compatibility
Although most contemporary microphones can accommodate both 24V and 48V phantom power, some older or specialised microphones might be tailored for one specific voltage. In such instances, it’s crucial to refer to the microphone’s documentation or contact the manufacturer to ensure compatibility with your selected voltage.
Power Consumption
The higher voltage (48V) phantom power may lead to increased power consumption compared to 24V. This increase might be marginal depending on the microphone. If power usage or battery-powered equipment operation is a concern like in my tests, utilising 24V could be a more energy-efficient alternative.
Heat Dissipation
As previously mentioned, a higher voltage can produce more heat in the microphone circuitry. If you expect lengthy recording sessions or elevated ambient temperatures, using 24V phantom power may help minimise potential heat accumulation and its effects on microphone performance.
In most situations, the audible differences between 24V and 48V phantom power are nuanced, and the decision often depends on personal preference and the unique needs of your recording setup. It’s wise to try both voltages and listen for any discernible differences in the microphone’s performance before committing to one option.
For fellow field recording enthusiasts, I’d love to hear about your experiences with battery packs and extended recording sessions. Have you encountered similar challenges, and if so, how did you overcome them? Share your thoughts, suggestions, and experiences in the comments section below. Let’s continue learning from one another and pushing the boundaries of what’s possible in the fascinating world of field recording.

Thank you for this! The double battery solution is an excellent way to circumvent the airline restrictions. I wanted to mention that some Anker power banks have a “low current” mode that prevents the pack from shutting off. Double clicking the pack button lights up a green LED on the remaining charge display to indicate it’s operating. The 24v vs 48v phantom issue with the XLR Clippy style EM272 mics is interesting. Most of the mic brands use an internal voltage regulator to supply the ~5volt capsule bias. These mics will just dump as heat any voltage much above about 12-volts, so it is reasonable to run the phantom at the lowest possible voltage, with no audible effect, and extend battery run-time.
LikeLiked by 1 person
Thanks Geoff. Yes, the doubled battery option for me is perfect. Good traveling option. I looked into the ‘trickle’ charge option on the Anker battery packs as well. Good for charging low draw devices like AirPods or similar things. However, my understanding is that this wont stay in trickle charge for very long. I think it has an auto shutoff – which would mean that long recording wouldn’t work in this mode?The USB switcher I use only cost about $AUD8, so this was an easy option for me. Have you experimented with the trickle charge option for longer recordings?
Good info on the 5 volt capsule bias. Very interesting. Sounds like running phantom power at the lowest possible voltage is the way to go for optimum battery usage. Thanks for posting your thoughts. Much appreciated – Mark
LikeLike